Saturday 27 November 2010

Old skills and new tricks


When I started my bunad project earlier this fall, I considered whether I needed to attend a course to learn how to assemble the bunad correctly. I had some sewing skills, but I have only been quilting and I never sewn any cloths. So I figured I could need some advice. After reading the assembly instructions, I realised that there were several techniques I did not know how to sew, e.g. something called a “rib seam” (direct translation of “spilesøm”) and a “tverregls” (I do not know how to translate). It was obvious. I needed some help, so I signed up for a weekend course.


The middle of November arrived and the time for the course came. I had finished the embroideries on the vest and the skirt of the bunad dress, so that I could use the course learning how to assemble the bunad. I thought that one weekend should be sufficient to finish the assembly, but was sadly mistaken. Most of the vest was to be sewn by had, and so were the wrinkles on the skirt. I soon realized that I needed to focus my efforts around learning the things I did not know beforehand, so that I knew all I needed to assemble the bunad after the course. That turned out to be a good strategy, and I learned many ingenious old skills and smart new tricks.


The first seem I needed to learn was the “rib seam”. I thought it was a decorative seam, but it was not. What it was, was, however, ingenious. With a rib seam, you can sew two peaces of cloth together, and at the same time sew the lining on to the vest in one seam (see picture to the left). That meant that it was possible to sew three seams in one seam, and it looked absolutely lovely as well. The seam was truly ingenious.


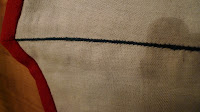
The second seam I needed to learn was the “tverregls”. I had no idea what this was, but it was to be sewn onto the slit of the skirt. It turned out to be another ingenious old skill. The aim is to reinforce the slit so that it will not tear if you have an accident when putting on your bunad. The idea is to sew button hole stitches (application stitches) along the bottom of the slit, and reinforce this with a string parallel to the bottom of the slit (see picture to the right). The string is sewn by 4-5 loose stitches across each end of the slit, approximately one centimetre above the bottom, and then grouped together with application stitches to make a nice cord.


The last thing a dreaded was the wrinkle stitches, which should be sewn by hand, thee rows, with exactly 0,5 cm between stitches and across rows. If the seem is not exact, the wrinkles will turn out bad. I imagined a long and painstaking job, but the course supervisor knew some tricks. She found a block of squared paper and started to cut strips of paper and pin them to the edge of the skirt. Then, it was only to follow the squares on the paper, and the stitches were perfectly wide and spaced apart (see picture to the left).


We had a long, informative and very nice weekend. Now, I am working hard to finish the assembly of the bunad. I have to hurry, since there is still much embroidery to do before I can attend the next bunad assembly course I have signed up for, due in January. Then, hopefully, I will learn how to assemble the shirt and the jacket (for which I have no assembly instruction). I really look forward to learn more old skills and new tricks.

Thursday 14 October 2010

My first ring shawl


I have been knitting several lace shawls this year, but I had not yet tried to knit a Shetland pattern. All my previous shawls have been Estonian patterns. I love them very much, but I wanted to knit a ring-shawl (that is a shawl you may thread through a ring ).

I had already bought a book about Shetland lace knitting on Amazon.com by Sharon Miller, called "Heirloom Knitting". It is a nice book, with a good description of the lace traditions on Shetland and many beautiful patterns. But there were no patterns in the book that I just had to knit right now.

So I searched the net for patterns, and found a web-site run by Sharon Miller, also named Heirloom Knitting. This sight is absolutely fantastic, with many beautiful patterns, yarns, hints and useful links, in addition to the books she has written. It contains everything you need to make a beautiful Shetland shawl.

I bought several patterns, and decided to start with a shawl called "1Ply Rosebud Shawl". It was not too big, so that I would be able to finish in a reasonable amount of time. I was also able to use the wooden frame I had already made to block the shawl out after I had finished knitting.


It took me about 150 hours to complete the shawl. Most of the center piece was knitted in a hotel room in Turkey this summer, escaping the hot afternoon sun with my daughter. I used a very fine light grey merino wool yarn called "Fine merino", which I bought at the web shop "Purl soho". It was a challenge to knit with such a fine yarn on 3,5 mm needles in the heat. My daughter and I had many nice afternoons, where she played GoSupermodel and listened to Justin Bieber while I was knitting.

It has been a while since I finished knitting the shawl, but I didn't have time to block it out until recently. The shawl is 155x155 cm and weighs 58 gram when finished. I was a bit unsure whether I would be able to thread the shawl through one of my rings, but I needn’t worry. It came through easily. I had made my first ring shawl!

Tuesday 12 October 2010

To make a Bunad


The Norwegian national holiday is on the 17th May. On that day, many (in particular) females wear a national costume called a bunad. They are copies of old galla dresses from the 16th to the 18th century, and was constructed during the Norwegian liberation from its union with Sweden, intended to boost the national sentiment in the population. Most of these patterns were constructed during the period 1850 - 1930. After 17th May this year, I decided that it was finally time for me to sew my own bunad.


There are many hundred different bunads, all depending on where in the country your ancestors originate from. I was bit a unsure about which bunad to choose, but landed on the Vest-Telemark bunad, which originates from the place where my father’s family comes from (see pictures).


I wanted to make my own bunad from scratch, so I ordered fabric, pattern, silver and thread from Husfliden, which is an organisation aiming to preserve old Norwegian craft traditions. They have several stores, where they, among other things, sell bunads. They also arrange craft courses to teach people to weave, make bunads, make traditional silverware and many other traditional handicrafts.

It took some time to get all the different pieces that makes up a bunad, and I had to wait for both the red cloth to the jacket and for them to make the pattern for my shirt again. But finally, in the beginning of September, all the materials arrived and I could pick them up at Husfliden. The box was so full that the lid would not fit on top. 

 I had never sewn the kind of stitches which were acquired for the embroidery on the bunad, but I knew how to do them and the pattern was printed on the fabric, so how hard could it be. It turned out to be harder than I expected, as the wool fabric was very coarse, which meant that I could not only use the natural holes in the weave to place the stitches because this would make the edges of the embroidery uneven. The angle of the stitches is also very important. So I started on the purse, so it would not be so expensive if I made a mistake. In that way, I could get some practice before starting on the more expensive parts of the bunad.


Now, I have finished the purse (it is only half done on the pictures), and I am almost finished with the embroidery on the edges of the skirt. I am going on a bunad course in the middle of November, and hope to have finished all the embroidery on the dress before this time so that I can use the time on the course to sew the bunad together.

Hopefully, I will have a bran new bunad to wear next 17th May.

Wednesday 29 September 2010

Knitting doll clothes


I love to knit doll clothes. It does not take a long time to make, and I have many lovely patterns. Also, most young girls love to receive new clothing for their dolls.


 I found this fantastic pattern book with baby clothes. Included was a doll size of all the patterns. I have knitted most of the patterns in the book, both for babies and dolls. Here are a couple of examples, knitted for my daughter’s dolls a couple of years ago.

An Amigurami birthday card


I have started a tradition of crocheting an Amigurami to my daughter’s class mates in stead of a traditional birthday card. It has become a nice tradition, and only two of her friends remain before all the girls in her class have got their own.


I found the pattern for these small amiguramis in the book "Vikla Amigurumi" by Mia Bengtson. Here are some pictures of the latest dolls. When these are given away, I have finished the first round. Whether there will be a second round remains to be seen.

Wednesday 1 September 2010

Mini-Annegrete


A colleague of mine was to start in a new job as a consultant. She had been my boss for many years, and now she was going out to conquer the world. To help her in this task, I though she needed a “Mini-Me”, capturing the essence of what she represents. Since I am not able to make a clone (as the original Mini-Me in the Austin Powers movies is), I had to crochet my own version of her (see her picture in the lower left corner).

The doll is based on two free doll patterns by Beth Webber, called "Free Spirit" and "Mini Free Spirit". The patterns are posted, along with many other beautiful patterns, on her blog named “By hock by hand”. The head, hands and feet are from the Mini Free Spirit doll, whereas the body is a variation on the Free Spirit doll. For the hair I used a very flossy yarn, crocheting the wig cap and using my crochet hock to pick out the strands, making a thick nice hair. I hope my colleague will think of us every time she is looking at her Mini-Me.

Thursday 5 August 2010

My three little helpers


First, I would like to thank my three little helpers, (from the left) Elise, Synne and Mia, for helping me showing off my shawls.

Birch leaf shawl


In Nancy Bush's book ”Knitted laces of Estonia” there are many beautiful patterns of knitted lace shawl where the main motif is from the nature. The most common motifs are the lily of the valley and various types of leaf and twigs. One of my favourites is this triangular shawl where the main motif is a birch leaf. The shawl is very easy and fast to knit. I chose an off-white Italian mohair yarn for this shawl, which was the only lace weight yarn I found at my local yarn supplier. This shawl probably looks good in many colours. In Nancy Bush's book, the shawl is in a lovely soft beige colour.

Queen Sylvia's shawl


I absolutely love to knit Estonian lace shawls. In the book "Knitted laces of Estonia" Nancy Bush have collected many beautiful patterns. My favourite pattern in the book is the Queen Sylvia Shawl. This shawl was designed for the Swedish queen, Sylvia, and given to her when she visited Tallinn in 1992. The main motif in the shawl is the lily of the valley with butterfly stitches on top. The pattern is relatively easy to knit, but the knobs and butterfly stitches require some practice. If this is the first time knitting knobs, this is a fine shawl to start with, since the knobs only consist of five stitches. I knitted this shawl in a fine black Italian mohair yarn I found at my local yarn supplier. I plan to wear this shawl with my black Christmas dress.

The Mankell shawl


You may also find this lovely shawl in Nancy Bush's book "Knitted laces of Estonia". The pattern is relatively complex, and may be a bit tricky to knit. The main motif is the Lilly of the valley, with seven stitches in the knob. The shawl is absolutely lovely, and is suited for a light summers dress. It is knitted in a lace weight lamb wool yarn I found on a net shop called Purl Shoho. I buy most of my lace weight yarn from abroad, since the supply of such yarn is limited in Norwegian stores. I only used one skein for this shawl. Since the shawl is knitted on 3 mm needles, the thin and delicate yarn makes the shawl very light and lacy. This shawl is knitted for my daughter Elise (lower right picture).


Thursday 3 June 2010

Tablecloths by Bente Mahlm


I never really liked tablecloths. I don’t like to iron them and I don’t really like the esthetics of embroidered tablecloths. They look like they belong in the home of an old lady. That is why I was really pleased when I discovered that quilted tablecloths often look really nice. The ironing is limited and they are fun to make as well.


In particular, I fell in love with the designs of Bente Mahlm. I have made a couple of tablecloths with fall motives, with applications of leaves and blueberries. I think they look very nice, but my husband does not like checked fabric, so they are banish to our summer home. The girl in the picture is my daughter, Elise, who thought pictures of just the tablecloth were boring.

Wednesday 12 May 2010

Amigurami dolls


One of my latest passions is to crochet Amiguramies. Hunting for good patterns, I found this fantastic blog (see By hoock by hand under My favorite blogs). On this blog I found several free patterns of different Amigurami dolls. Beth (who writes this blog) has also posted free patterns for clothing and pets for the dolls.

My challenge in making these dolls was to find all the right materials. First, I needed a thick skin colored acrylic yarn, which was impossible to find in Norway, as most shops and producers only sell wool yarn. Searching the net, I found an American net shop selling the exact same yarn as Beth used when making her dolls (see Craft Design 4 you under my Favorite Net Shpos). My next problem was that I could not find eyes that did not look like they belong to a teddy bear in my local craft shops. However, Beth had posted a couple of links to craft shops on the net selling several beautiful eyes (see e.g. Suncatcher Eyes under My Favorite Net Shops).


I made a version of Beth’s Free Spirit doll for my daughter for her nine year birthday. I tried to make the doll look like her, with blue eyes and blond hair. I also crochet several outfits for her. My daughter loved her doll.

Tuesday 11 May 2010

Lilac leaf shawl


I have spent hours on Amazon.com in search of good crafts books. Ones, while searching for crochet laces, I found a very beautiful book describing the tradition of Estonian knitted laces (here is a link to the book). The book was filled with the most beautiful patterns, in addition to telling the story of how the local women of Haapsalu, on the Baltic coast of Estonia, during the 19th century knitted the entire winter in order to sell their shawls to wealthy Swedes and Russians visiting their town during the summer months. There are also specific stories to several of the shawl patterns, making it very interesting to read and to knit.

I decided to make the lilac leaf shawl for my Spanish sister in law as a birthday present. I had problems finding a lace weight yarn. None of the Norwegian producers made such a thin yarn. Finally I found an Italian lace weight mohair yarn. Knitting laces with a mohair yarn was a challenge, but it made the shawl warm and fuzzy, and very suitable for cold spring days (Norwegians celebrate their national holyday on the 17. May, when it may still be very cold).

In order for these shawls to look good, they must be blocked out after knitting. The finished shawl is gently washed, and stretched out on a wood frame with brass nails in it, and air dried. This makes the pattern more visible and the finished shawl very thin and even. It also gives a nice effect, making the edges wavy where the shawl has been attached to the nails.

Discovering Amiguramies


One day, when I was shopping for a birthday present for one of my daughter’s class mates, I spotted a little book about crocheted Amiguramies. It reminded me of the Zech puppet theatres of the children’s programs of my youth. The book was full of very sweet and small Amiguramies, and I couldn’t resist buying it.


I have crocheted a couple of the puppets in the book. Several of the Amiguramies are so small that I only use a couple of hours making them. I have started a tradition crocheting a little doll to attach to each birthday present, instead for writing a card. It has become very popular among my daughter’s class mates.


I was not the only one in my family to enjoys Amiguramies. My daughter started an Amigurami club, where she and her friends meet every Sunday to make things for the Amiguramies. I have crocheted a little bear for everyone, and they are making dresses, hats, sleeping bags, skirts, and much more for their Amiguramis. It has been a nice way to teach them how to crochet.