Monday, 20 June 2011

Mini-Bodil

Bodil is the closest of my colleagues, and we have worked closely together for almost 15 years. She is very active, and cycles every day to work, both winter and summer, through snow and rain. She also works out a lot, but she hates to walk the stairs and go for long walks. The only thing she hates more is to take the tram to work. So when she fractured her thumb in the ski slopes this Christmas, she walked for two hours to get to and from work.
Bodil was lost when she could no longer cycle to work. So I thought the theme for her doll should be "A lost cycle season", featuring Mini-Bodil lying face down in the snow. However, Bodil worked out a lot, and by the beginning of May, she was on her bike again. Considering the severity of her injury, this was so impressing that the title for her Mini-Me had to be "A recovered bicycle season".

The problem with this theme was that I had to crochet a bicycle, which I had no idea how to do. I searched high and low for materials to make it with, and found some aluminum rods I could use. With some help from my husband concerning how a bicycle is constructed, it was far easier than I expected, even if I sewed the gear on the wrong side of the bike. If you want to read more about how I crocheted the bike, see this blog.

Mini-Bodil is like the other Mini-Mes a modification of Beth Webber's doll "Mini Free Spirit". You can find patterns for this and many other beautiful dolls, with clothing and more, on her blog "By hock by hand". The hair is made of a mixture of Faerytale from Du store alpakka and Plumet from Sesia. Her eyes are from Sunchatcher Eyes, and the doll herself is crocheted in an acrylic yarn I found on Craft designs 4 you called Red Heart Super Saver. Her clothing is crocheted from leftovers.

Bodil's birthday was on the 6th June, and I hope she will enjoy her Mini-Me.

The art of crocheting a bike

One of my projects this year has been to crochet a mini version of my nearest colleagues for their birthday. I have dreaded to make Bodil for a long time, because I needed to crochet a bicycle for her, and I had no idèe how to do it. I searched everywhere for a model bike or a toy bike in the right size, but found nothing. As Bodil's birthday approaches, I realized that I needed to crochet the bike myself.


I started by looking in crafts shops for something to build my bicycle with. I found some flexible aluminium rods, winded up in a spiral, I could use. The spiral was a perfect size for the wheels on the bike.

I winded a thin metal tread around the spiral, and made spokes using metal flower sticks. To make the tires, I crochet a circle, added some stitches, and then decreased them back again. This made a perfect tire. I padded the tires and sew them on the metal wheels. Then I embroidered a zigzag stitch, which I learned while making my bunad, to give the impression of tread pattern.
When the wheels were finished, I started to believe that I could make this, and I started to form the bicycle frame. I needed a construction drawing of a bike, and went to my husband for some help, as I am terrible at drawing bicycles.


The frame is made up of two triangles, held together with metal thread. I then made the fork and handlebars, and attached them to the frame as well. Finally, I made the seat, the baggage rack and pedestal, and attached them to the frame.
When the frame was finished, I was tired (the clock was 23.30) but happy. But then I realized that I did not know what my colleague's bike looked like. So I concocted a stupid story that I was planning to buy a new bike, but had a history of choosing by color and not quality..., "and what color is your bike by the way?" "Golden orange", was the answer. I did not know what kind of colour that was, but started to look for suitable yarn to cover the frame.

The closest I came to golden orange was a thick yellow orange acrylic yarn. It was too heavy, but the assortment of orange yarn was limited, so it had to do. I found a silver yarn called Metallic Fine from Anchor, to crochet the details in chrome. Then I started to crochet strips which I sew on to the frame. I also attached three gears to the bike.


Some details in black for the handles, pedals and the seat, and the bike was finished. When I showed the bike to my husband, he started to laugh. I had sewn the gear on the wrong side of the bike. I didn't bother to correct it, as this would involve doing the pedals all over again. It would have to do. I thought my bike looks nice, and hope that others do not see the error as fast as my husband did.

Six small kitchen mice

When we bought our cabin, it needed touching up. This also applied for the curtains. The curtains in the kitchen were not better than several others, but still very ugly. I wanted to make some new ones.

So I went to by some fabric. I ended up with a white and blue fabric with garlic, chive and other herbs on it.


I wanted to make a nice valance for the kitchen window, both as decoration and to prevent people from looking in. I found patterns of six very sweet kitchen mice in a book filled with cross stitch patterns of Beatrix Botter's pictures. I have embroidered several of the patterns in this book earlier, among others a tailor mouse and Peter rabbit. It does not matter that this book is in French (which I don't know), as all the patterns are self-explanatory.

I had problems taking good pictures of the curtain, due to the back light from the window. So I took the valance down to take some pictures.
The mice came out nicely, and really look good in my kitchen. But I have to admit that I prefer Beatrix Potter's version better than real mice in the kitchen.


A new bunad for the 17th May


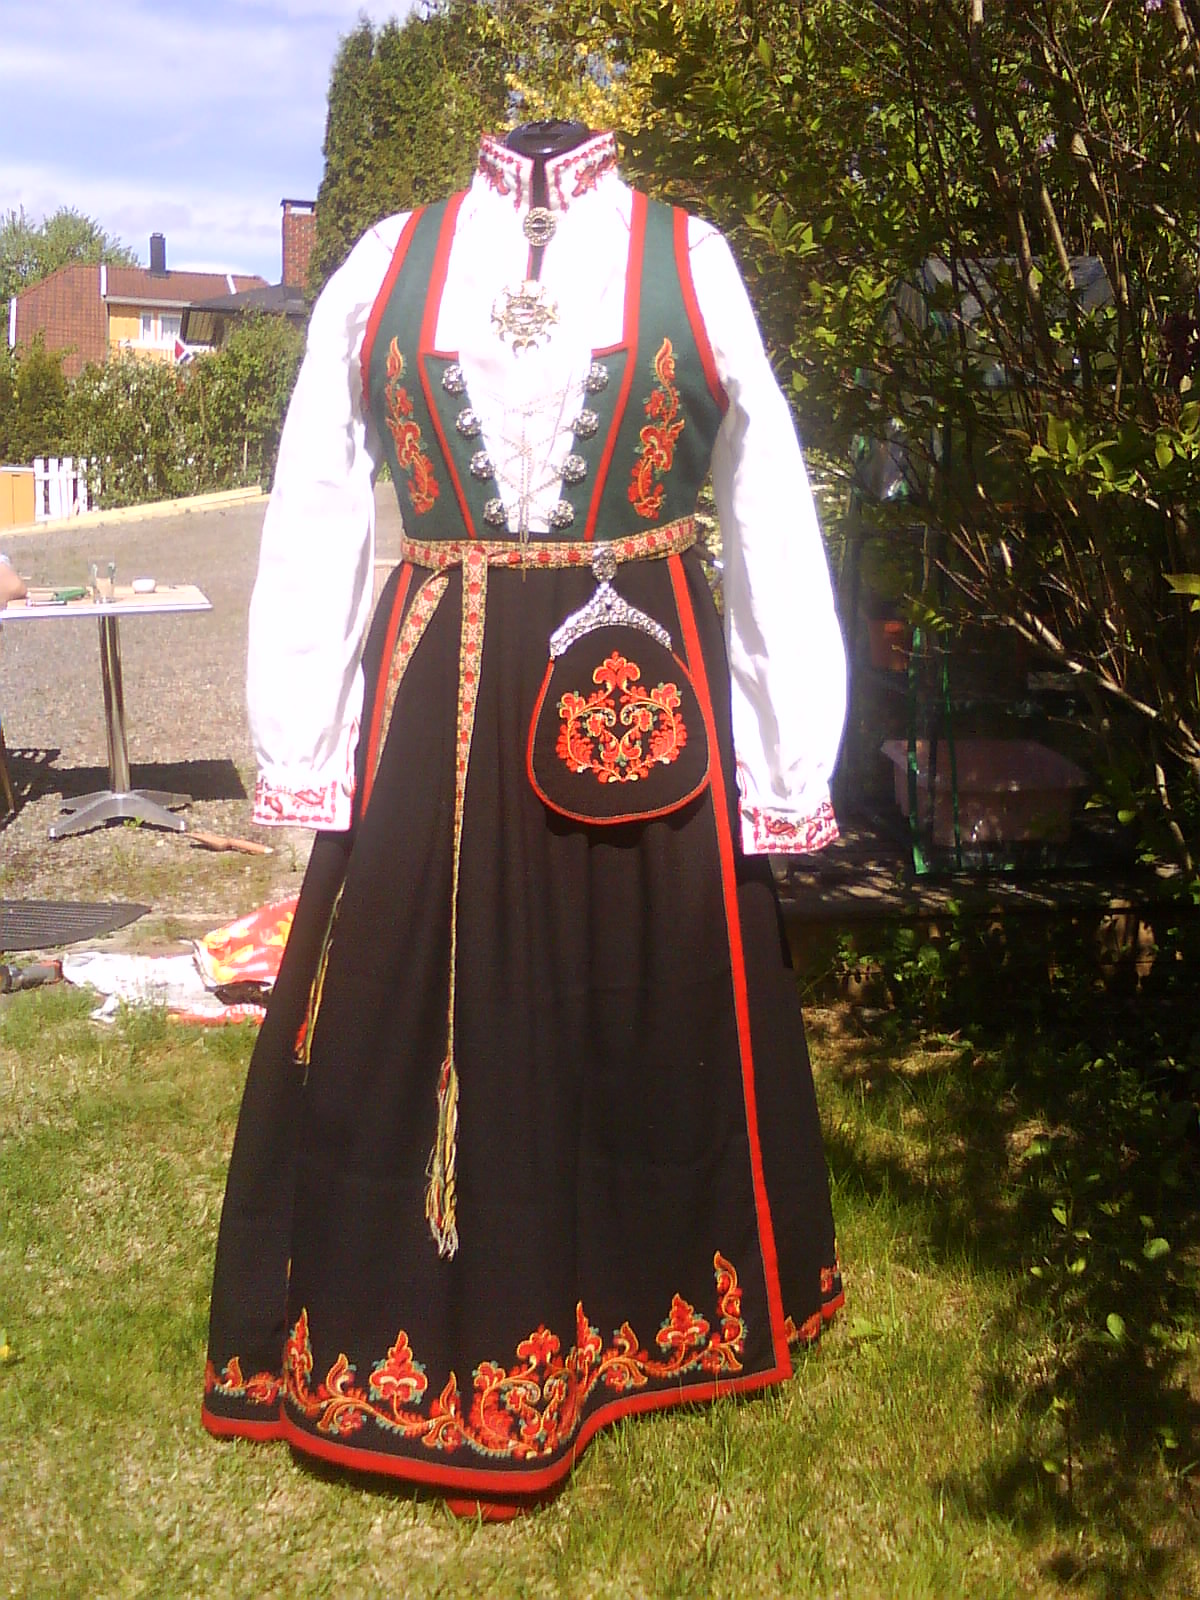
The 17th May is the Norwegian national holyday, when everybody dress up and walk in the parade. Bunads are traditional folk costume. They are copies of old dresses (from the 18th and 19th century), and varies across the country. I made my own bunad from Telemark, where my fathers ancestors comes from. It took me almost 8 months, but I managed to finish before the 17th May.

I encountered several problems making this bunad. First, the shirt was too small, and I had to get it re-cut. Second, I had no instructions of how to put the jacket together. But with help from the instructor at my bunad course, these problems were overcome.


I have to admit the new shirt is still a bit tight over the shoulders, but I can manage. I do not want to make the shirt all over again. And, I have to admit that I was rather pleased with it. In particluar, I like the zigzag embroidery on the shoulders and along the neck-line. I also like the red wavy embrodery along the collar. I chose to make a "flee ladder" (directly translated from Norwegian) at the bottom the collar opening in the frot (see picture to the left), even if it was not specified in the instruction.

The jacket was much easier to put together than I had feared. It was actually quit strait forward, even without instructions. The only thing I was unsure of was how to attach the embroidered bindings on the sleeves, as they were apparanty too long. But the instructor at my course suggested that I also attached the binding down the split in the sleeve, which seemed to fit the embroidery perfectly (see picture to the right).

This bunad is probably the largest project I have ever taken on, but I loved every minute of it, and I would love to do it again. The next bunad is for my daughter. The fabric is ordered, and the plan is to finish before the next 17th of May.

 Here I am in my new bunad.

The Ogee lace shawl

After knitting several shawls, both from Shetland and Estonian, I wanted to design my own shawl. I had found a beautiful pattern that I wanted to knit, called the "Ogee lace" in the book "A treasury of knitting patterns", by Barbara G. Walker.
 
An ogee is a s-shaped curve. This pattern forms soft s-shaped curves with flowers in them. I had to change the pattern somewhat, as the pattern in the book was not symmetrical, something I wanted it to be. It's a very beautiful pattern, but it requires some skills to knit, as the pattern is knitted on both sides.


I love this pattern, and wanted it to form the center of my shawl. I also wanted the borders to have soft forms. For the inner border, I chose a paw-pattern I found in the book "The Haapsalu Shawl. A knitted Lace Tradition from Estonia", by Siiri Reinmann and Aime Edasi. For the outer border, I chose a pattern called "Ocean wave", which I found in the book "Heirloom Knitting" by Sharon Miller.

I have used a lace weight merino yarn from Gossamer, which I found in Sharon Miller's net shop "Heirloom Knitting". The shawl is 110x180 cm and weights 56 grams.

I have written the pattern for the shawl, and it is available for free here. Unfortunately, it is in Norwegian. I will try to translate it later. You can find explanations to the symbols (in English) here. To download the file, go to "File" and "Download original".

Thursday, 5 May 2011

To dream under water


We have a summer home in the skerries of the Oslo fjord. It is very small, only 37 m2, but has many smart solutions. This makes it possible for us to live there for longer periods of a time. One of the smart solutions is a box bed behind a curtain in the hallway. The curtain was a bit dreary, so I wanted to quilt a nice drape in front of the alcove.


The theme for the drape was “An under water dream”. It is made of a large piece of backing fabric, and measures 210x190cm. It has applications of fishes, sea turtles, mussels, starfishes, corals, kelp and seaweeds. The aim was to make it dark enough to sleep behind the drape.

I have had the pleasure to snorkel with sea turtles twice in my life, and it is a magnificent experience. The last time I snorkelled with turtles, I was with my daughter, who were to sleep in the bed box. Thus, I wanted sea turtles on the drape. I found a nice pattern for the application of the sea turtles and sea weed, named "Follow me", designed by Carol. The pattern for the corals and the yellow and black fishes, is "Dolphin Bay" from Cornelia W. Carpenter.


Additionally, I found some pictures of various fish on the net, and made my own patterns (see pictures below). I particularly enjoyed making the clown fishes.


I also loved to make the turtles. In the original pattern, the turtle in front was looking behind to the other turtles, as to urge them to follow him. I wanted the turtle in front to look at the fishes in the foreground, to focus the attention on the minor details on the curtain (see pictures below).

The drape hangs in a narrow corridor, which makes it difficult to make an overview picture. I have tried, and if you see the two pictures below in relation, it gives an idea of how the curtain is put together.

 
The drape works as a charm, and nobody can see that there is a box bed behind it. Additionally, it gives a lot of colour and atmosphere to our summer home.

Thursday, 14 April 2011

Mini-Iulie


This is Mini-Iulie. She loves the nature, and likes to go on long trips cross country skiing or hiking in the mountains. She is very concerned with issues of bio-diversity, and tries to make people be precautionary with gene modified produce. Here, she is evaluating bio-diversity in a gene modified corn field. She likes to dress in colourful cloths, and her favourite colour is sea green.

Mini-Iulie is a modification of Beth Webber’s doll "Mini Free Spirit", which you can find the pattern for on her blog "By hook by hand". The hair is made by crocheting some big curles in Faerytail from Du store alpakka, covered by some angle hair I found in my local crafts store.

Her shawl is made by a thin quilting thread in Egyptian cotton, called King Tut. Her cloths are crochet in a no. 10 crochet yarn called Sissy 10.

You can find the pattern for the butterflies in the book "100 Flowers to Knit and Crochet". Her eyes is bought in the net shop Suncatcher eyes.
 
This doll is to be given to a colleague of mine called Iulie, on her 55 birthday (see the picture on the left). I hope they will enjoy each others company.

Mini-Cathrine


This is Mini-Cathrine. She is an active person. Her favourite hobby is to kite, both on snow and on water. Today, she is kiting on water. Even though she is no longer a youth, she still chooses to spend most of her spare time kiting with (mainly) young fit men in their early twenties, much to the other Mini-Me’s astonishment.

The water is made by the Catharine wheel stitch (see here for an instructional video of how to crochet this stitch ). This stitch makes an uneven surface which reminds me of small waves. Her hair is made by a flossy yarn, in the same fashion as Mini-Annegrete. Her eyes is bought in a net shop called Suncatcher eyes.

Her kite is crochet in two layers, with padding in between and pipecleaners along the edges. This makes it possible to form the kite in an arc, which gives the illusion that it is filled with air and blowing in the wind. The kite board is padded with quilting padding, and sewn onto the water with a doll stand inside.

Mini-Cathrine is, as my other Mini-Me dolls, a modified version of Beth Webber’s doll "Mini Free Spirit". You can find this, and many other beautiful doll patterns, on her blog "By hook by hand". Mini-Cathrine is to be given to a colleague of mine (see picture on the right) on her 48th birthday right before easter.